

引言#
Java 中的 CPU 资源分配对象是 Thread,Go 中的 CPU 资源分配对象是 goroutine。Java Thread 与操作系统的线程是一一对应的关系;goroutine 是 Go实现的用户轻量级线程,通过 GPM 进行管理,与操作系统是 n:m 的关系。
本文旨在通过剖析源码,研究 Java 和 Go 中的线程模型具体的实现和设计思想。
Java Thread#
Hotspot JavaThread#
在 Hotspot VM 中,Java 中的java.lang.Thread 和操作系统 Thread 是 1:1 的关系,Java 线程会在 start 的时候创建对应的操作系统线程,在Java线程终止的时候回收操作系统线程。
Hotspot 中对与 thread 相关的代码在 jdk/src/hotspot/share/runtime 中,Java11 的JavaThread 是定义在 thread.hpp 和 thread.cpp 中,源码可以看 jdk-11+28 hotspot runtime
// Class hierarchy
// - Thread
//   - NamedThread
//     - VMThread
//     - ConcurrentGCThread
//     - WorkerThread
//       - GangWorker
//       - GCTaskThread
//   - JavaThread
//     - various subclasses eg CompilerThread, ServiceThread
//   - WatcherThread

// Thread
class Thread: public ThreadShadow {
  friend class VMStructs;
  friend class JVMCIVMStructs;
 private:
	GCThreadLocalData _gc_data; // GC 中的 ThreadLocal 数据
 protected:
	void*       _real_malloc_address; // 真实分配地址
 protected:
  OSThread* _osthread; // 和 Thread 关联的 os Thread
}

// JavaThread
class JavaThread: public Thread {
  friend class VMStructs;
  friend class JVMCIVMStructs;
  friend class WhiteBox;
 private:
  JavaThread*    _next;            // Threads列表中的下一个 thread
  bool           _on_thread_list;  // 当前 JavaThread 是否在Thread列表中
  oop            _threadObj;       // Java级别的线程对象
}

JavaThread::JavaThread(bool is_attaching_via_jni) :
                       Thread() {
  initialize();
  if (is_attaching_via_jni) {
    _jni_attach_state = _attaching_via_jni;
  } else {
    _jni_attach_state = _not_attaching_via_jni;
  }
  assert(deferred_card_mark().is_empty(), "Default MemRegion ctor");
}
Java11 的 Hotspot 中,会有一个父类 Thread,Thread 中定义 _osThread 用于关联操作系统线程,针对不同父类会有以下子类实现 ( HotSpot Runtime Overview #Thread Management ):
- NamedThread:具有名字的、代表唯一命名实例的线程,定义了
_name表示线程名- VMThread:负责执行 VM 操作的线程,如 scavenge, garbage_collect 等
- ConcurrentGCThread:负责并发执行垃圾回收的线程
- WorkerThread:指代具有分配工作ID的工作线程,
_id作为具体的工作ID- GangWorker:字面理解是帮派工作线程
- GCTaskThread:负责GC任务的工作线程
- JavaThread:对应
java.lang.Thread- CompilerThread:负责运行时,将编译后的字节码转换成机器码 (native thread) 的线程
- ServiceThread:用于低内存检测和JVMTI (虚拟机提供的native接口)
- WatcherThread:负责模拟时钟中断 (simulate timer interrupts)
public:
  // Constructor
  JavaThread();                            // delegating constructor
  JavaThread(bool is_attaching_via_jni);   // for main thread and JNI attached threads
  JavaThread(ThreadFunction entry_point, size_t stack_size = 0);
  ~JavaThread();

JavaThread::JavaThread(bool is_attaching_via_jni) :
                       Thread() {
  initialize();
  if (is_attaching_via_jni) {
    _jni_attach_state = _attaching_via_jni;
  } else {
    _jni_attach_state = _not_attaching_via_jni;
  }
  assert(deferred_card_mark().is_empty(), "Default MemRegion ctor");
}

JavaThread::JavaThread(ThreadFunction entry_point, size_t stack_sz) :
                       Thread() {
  initialize();
  _jni_attach_state = _not_attaching_via_jni;
  set_entry_point(entry_point);
  // Create the native thread itself.
  // %note runtime_23
  os::ThreadType thr_type = os::java_thread;
  thr_type = entry_point == &compiler_thread_entry ? os::compiler_thread :
                                                     os::java_thread;
  os::create_thread(this, thr_type, stack_sz);
}
具体看 JavaThread 的 Constructor,我们可以看到它有两种构造方式,其中 JavaThread(bool is_attaching_via_jni) 仅用于主线程和JNI的连接。故我们所使用的用户线程构造方法是 JavaThread(ThreadFunction entry_point, size_t stack_size = 0) ,这里对 _osthread 进行了创建和绑定,这也决定了在 Hotspot 虚拟机中,Java Thread 与 操作系统线程是一一对应的关系。
Thread JNI#
Hotstop 虚拟机中用c++定义了 JavaThread, 对应 JDK 中的 java 定义的 Thread 类,从java调用C++ 使用的是JNI (Java Native Interface)。那么JNI是如何将这两处代码连接起来的?
下面通过源码看看,从创建Java中的Thread对象,到创建VM 中的 JavaThread 是怎样的过程
public class Thread implements Runnable {

	public synchronized void start() {
		if (threadStatus != 0)
            throw new IllegalThreadStateException();

        group.add(this);

        boolean started = false;
        try {
		    // native 方法 创建
            start0();
            started = true;
        } finally {
            try {
                if (!started) {
                    group.threadStartFailed(this);
                }
            } catch (Throwable ignore) {
            }
        }
	}

	private native void start0();
}
这部分可以看到,在Thread.start() 方法中,会调用 start0() 的native方法去创建一个操作系统线程。换句话说,只是 new Thread()仅仅是在 Java程序中创建了thread对象,并没有对应的系统资源,只有调用了start方法后才会在虚拟机中创建对应的资源。JDK在jdk/src/java.base/share/native/libjava/Thread.c 中定义了Java中native方法所对应vm 中的 function。
需要注意的是 JNI 的定义是在JDK中用c实现的,但是并未在虚拟机的源码中,这意味着如果不使用Hotspot虚拟机,我只需要在 openjdk 的基础上,在新的虚拟机中实现 JVM_StartThread 方法就行
static JNINativeMethod methods[] = {
    {"start0",           "()V",        (void *)&JVM_StartThread},
    {"stop0",            "(" OBJ ")V", (void *)&JVM_StopThread},
    {"isAlive",          "()Z",        (void *)&JVM_IsThreadAlive},
    {"suspend0",         "()V",        (void *)&JVM_SuspendThread},
    {"resume0",          "()V",        (void *)&JVM_ResumeThread},
    {"setPriority0",     "(I)V",       (void *)&JVM_SetThreadPriority},
    {"yield",            "()V",        (void *)&JVM_Yield},
    {"sleep",            "(J)V",       (void *)&JVM_Sleep},
    {"currentThread",    "()" THD,     (void *)&JVM_CurrentThread},
    {"countStackFrames", "()I",        (void *)&JVM_CountStackFrames},
    {"interrupt0",       "()V",        (void *)&JVM_Interrupt},
    {"isInterrupted",    "(Z)Z",       (void *)&JVM_IsInterrupted},
    {"holdsLock",        "(" OBJ ")Z", (void *)&JVM_HoldsLock},
    {"getThreads",        "()[" THD,   (void *)&JVM_GetAllThreads},
    {"dumpThreads",      "([" THD ")[[" STE, (void *)&JVM_DumpThreads},
    {"setNativeName",    "(" STR ")V", (void *)&JVM_SetNativeThreadName},
};
那么 Hotstop 虚拟机 中又是如何实现 JVM_StartThread 的,这里我们需要看 jdk/src/hotspot/share/prims/jvm.cpp
JVM_ENTRY(void, JVM_StartThread(JNIEnv* env, jobject jthread))
  JVMWrapper("JVM_StartThread");
  JavaThread *native_thread = NULL;
  bool throw_illegal_thread_state = false;
  // We must release the Threads_lock before we can post a jvmti event
  // in Thread::start.
  {
    MutexLocker mu(Threads_lock);

    if (java_lang_Thread::thread(JNIHandles::resolve_non_null(jthread)) != NULL) {
      throw_illegal_thread_state = true;
    } else {
      jlong size =
             java_lang_Thread::stackSize(JNIHandles::resolve_non_null(jthread));
      NOT_LP64(if (size > SIZE_MAX) size = SIZE_MAX;)
      size_t sz = size > 0 ? (size_t) size : 0;

			// 创建 Hotstop 中的 JavaThread,同时创建对应的 _osthread
      native_thread = new JavaThread(&thread_entry, sz);
      if (native_thread->osthread() != NULL) {
        // Note: the current thread is not being used within "prepare".
        native_thread->prepare(jthread);
      }
    }
  }

  if (throw_illegal_thread_state) {
    THROW(vmSymbols::java_lang_IllegalThreadStateException());
  }

  assert(native_thread != NULL, "Starting null thread?");

  if (native_thread->osthread() == NULL) {
    native_thread->smr_delete();
    if (JvmtiExport::should_post_resource_exhausted()) {
      JvmtiExport::post_resource_exhausted(
        JVMTI_RESOURCE_EXHAUSTED_OOM_ERROR | JVMTI_RESOURCE_EXHAUSTED_THREADS,
        os::native_thread_creation_failed_msg());
    }
    THROW_MSG(vmSymbols::java_lang_OutOfMemoryError(),
              os::native_thread_creation_failed_msg());
  }

	// 开始执行,执行 os::start_thread
  Thread::start(native_thread);

JVM_END
我们总结一下上面的链路
Thread::start() →
native start0() → JNI JNINativeMethod →
JVM_StartThread → Hotstop JavaThread → osthread
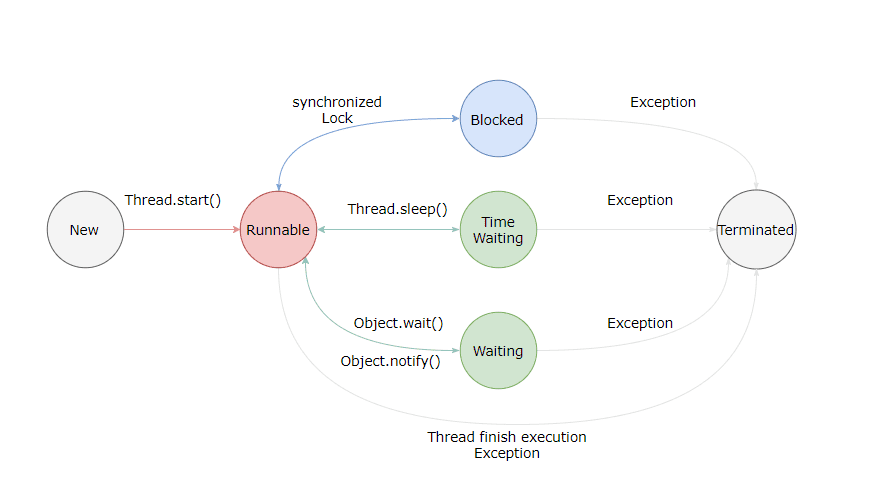
线程状态 JMVTI Thread State#
JDK中的 Thread.class 和 c++ 代码中的 JavaThread 是一一对应的,线程具体的执行、流转等也是在虚拟机处理的,所以线程状态 (thread status) 在 Hotstop 虚拟机也需要有对应的地方,即JMVTI Thread State,对应的源码是 jvmtiThreadState.hpp
- NEW → JVMTI_THREAD_STATE_ALIVE :
0x0001 - RUNNABLE → JVMTI_THREAD_STATE_RUNNABLE :
0x0004 - BLOCKED → JVMTI_THREAD_STATE_BLOCKED_ON_MONITOR_ENTER :
0x0400 - WAITING → JVMTI_THREAD_STATE_WAITING_INDEFINITELY :
0x0010 - TIMED_WAITING → JVMTI_THREAD_STATE_WAITING_WITH_TIMEOUT :
0x0020 - TERMINATED → JVMTI_THREAD_STATE_TERMINATED :
0x0002
public class Thread implements Runnable {
	/*
     * Java thread status for tools, default indicates thread 'not yet started'
     */
    private volatile int threadStatus;

		public enum State {
				// Thread state for a thread which has not yet started.
        NEW,

        // Thread state for a runnable thread.
        RUNNABLE,

        // Thread state for a thread blocked waiting for a monitor lock.
        BLOCKED,

        // Thread state for a waiting thread.
        WAITING,

        // Thread state for a waiting thread with a specified waiting time.
        TIMED_WAITING,

        // The thread has completed execution.
        TERMINATED;
	}
}

public class VM {
	/* The threadStatus field is set by the VM at state transition
     * in the hotspot implementation. Its value is set according to
     * the JVM TI specification GetThreadState function.
     */
    private static final int JVMTI_THREAD_STATE_ALIVE = 0x0001;
    private static final int JVMTI_THREAD_STATE_TERMINATED = 0x0002;
    private static final int JVMTI_THREAD_STATE_RUNNABLE = 0x0004;
    private static final int JVMTI_THREAD_STATE_BLOCKED_ON_MONITOR_ENTER = 0x0400;
    private static final int JVMTI_THREAD_STATE_WAITING_INDEFINITELY = 0x0010;
    private static final int JVMTI_THREAD_STATE_WAITING_WITH_TIMEOUT = 0x0020;

	public static Thread.State toThreadState(int threadStatus) {
        if ((threadStatus & JVMTI_THREAD_STATE_RUNNABLE) != 0) {
            return RUNNABLE;
        } else if ((threadStatus & JVMTI_THREAD_STATE_BLOCKED_ON_MONITOR_ENTER) != 0) {
            return BLOCKED;
        } else if ((threadStatus & JVMTI_THREAD_STATE_WAITING_INDEFINITELY) != 0) {
            return WAITING;
        } else if ((threadStatus & JVMTI_THREAD_STATE_WAITING_WITH_TIMEOUT) != 0) {
            return TIMED_WAITING;
        } else if ((threadStatus & JVMTI_THREAD_STATE_TERMINATED) != 0) {
            return TERMINATED;
        } else if ((threadStatus & JVMTI_THREAD_STATE_ALIVE) == 0) {
            return NEW;
        } else {
            return RUNNABLE;
        }
    }
}
线程池#
ThreadPoolExecutor#
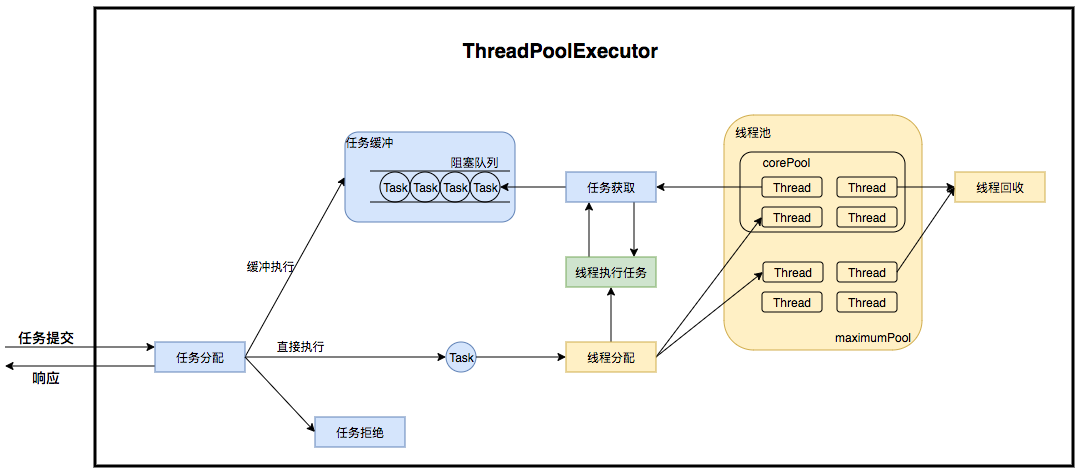
Java官方库在 JDK 中提供线程池 ThreadPoolExecutor,用于线程复用和线程管理。关于 ThreadPoolExecutor 已经有很多优秀的文章介绍了,这里仅仅强调几个比较重要的参数和线程池的执行流程
ThreadPoolExecutor 线程池创建时有以下3个比较重要的参数:
- corePoolSize:核心线程池数,指的是最小保持活跃线程的数量
- maximumPoolSize:线程池允许创建的最大线程数量,当线程池的任务队列满了之后,可以创建的最大线程数
- workQueue:线程池存放任务的队列,用来存储线程池的所有待执行任务
同时还有一些内部参数至关重要:
- AtomicInteger ctl:主控制参数,记录了线程池的状态和工作线程数量。ctl是一个32位的二进制(包含符号位),去掉符号位有31位,线程池中使用后29位来表示工作线程数,最多可以计数5亿个;用前3位 (包含符号位) 表示线程池的状态。对 ctl 的修改通过 CAS + volatile 保证其线程一致性.
- HashSet
workers :正在运行的工作线程,必须在获取到 mainLock 时才能访问,数量和 ctl 中存储的数量是相同的 - ReentrantLock mainLock:用于线程池的锁,对线程池中的 workers 进行访问时,需要先获得此锁,注意这是一个非公平锁
线程池的的执行流程如下:
- 如果当前的工作线程数小于核心线程池数 corePoolSize,则尝试创建工作线程并执行任务。如果成功则返回;否则进入2
- 尝试将任务添加至等待队列 workQueue,添加成功则二次检查 (从第1步检查后可能有死亡的),如果二次检查发现没有正在运行的线程,则创建工作线程并执行;否则进入3
- 添加队列失败,尝试直接创建工作线程,如果当前运行的线程数量未超过maximumPoolSize,则创建工作线程并执行;否则执行拒绝策略 handler
public class ThreadPoolExecutor extends AbstractExecutorService {
		private final AtomicInteger ctl = new AtomicInteger(ctlOf(RUNNING, 0));
		private final ReentrantLock mainLock = new ReentrantLock();
		private final HashSet<Worker> workers = new HashSet<>();

		private volatile int corePoolSize;
		private volatile int maximumPoolSize;
		private final BlockingQueue<Runnable> workQueue;
		private volatile long keepAliveTime;
		private volatile ThreadFactory threadFactory;
		private volatile RejectedExecutionHandler handler;

		private static final int COUNT_BITS = Integer.SIZE - 3;      // 29
		// 11111...111   2 ^ 29 - 1
		private static final int COUNT_MASK = (1 << COUNT_BITS) - 1;

		// 线程池自身的状态 state
		private static final int RUNNING    = -1 << COUNT_BITS;    // 101
		private static final int SHUTDOWN   =  0 << COUNT_BITS;    // 000
		private static final int STOP       =  1 << COUNT_BITS;    // 001
		private static final int TIDYING    =  2 << COUNT_BITS;    // 010
		private static final int TERMINATED =  3 << COUNT_BITS;    // 011

		// 去掉前3位状态,获取工作线程数量
		private static int workerCountOf(int c)  { return c & COUNT_MASK; }
		// rs-state (RUNNING/SHUTDOWN/STOP/TIDYING/TERMINATED)
		// 如果wc=0,则此方法返回线程池state;如果w=workerCountOf(c),则此方法返回 ctl 真实值
		private static int ctlOf(int rs, int wc) { return rs | wc; }

		public void execute(Runnable command) {
        if (command == null)
            throw new NullPointerException();
        /*
         * Proceed in 3 steps:
         *
         * 1. If fewer than corePoolSize threads are running, try to
         * start a new thread with the given command as its first
         * task.  The call to addWorker atomically checks runState and
         * workerCount, and so prevents false alarms that would add
         * threads when it shouldn't, by returning false.
         *
         * 2. If a task can be successfully queued, then we still need
         * to double-check whether we should have added a thread
         * (because existing ones died since last checking) or that
         * the pool shut down since entry into this method. So we
         * recheck state and if necessary roll back the enqueuing if
         * stopped, or start a new thread if there are none.
         *
         * 3. If we cannot queue task, then we try to add a new
         * thread.  If it fails, we know we are shut down or saturated
         * and so reject the task.
         */
        int c = ctl.get();
        if (workerCountOf(c) < corePoolSize) {
            if (addWorker(command, true))
                return;
            c = ctl.get();
        }
        if (isRunning(c) && workQueue.offer(command)) {
            int recheck = ctl.get();
            if (! isRunning(recheck) && remove(command))
                reject(command);
            else if (workerCountOf(recheck) == 0)
                addWorker(null, false);
        }
        else if (!addWorker(command, false))
            reject(command);
    }

}
其他的更详细的内容,可以参考这两篇文章
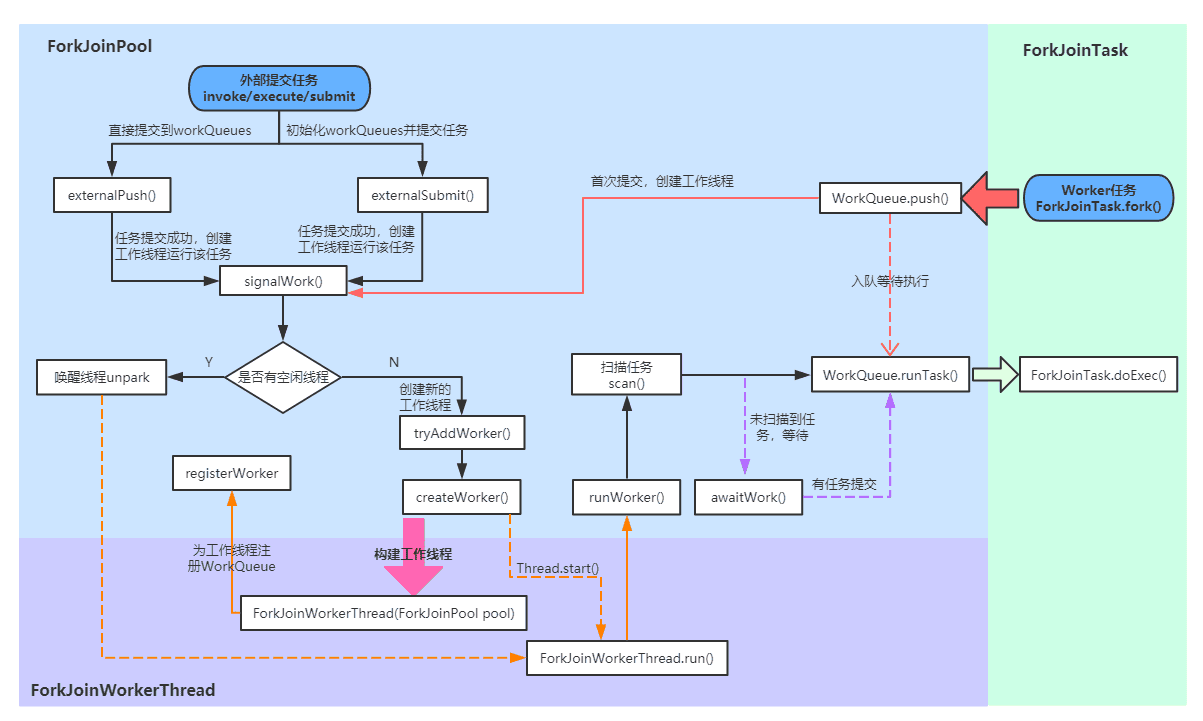
ForkJoinPool#
ForkJoinPool 是 JDK 1.7 之后官方库提供的另一种线程池,是一种基于 Fork/Join 框架的线程池,在JDK1.7之后的版本提供。ForkJoinPool 主要采用了两种思想 ( A Java Fork/Join Framework) :
- 分治算法 (Divide-and-Conquer):把任务递归拆分为各个子任务,例如将一个规模为N的任务分解(Fork)为K个规模较小的子任务,这些子任务之间相互独立且与原问题性质相同。等待子任务完成后,收集他们的结果合并 (Join)。
- 工作窃取算法 (Work-Stealing):指一个工作线程没有本地任务要运行时,尝试从另一个工作线程中“偷”一个任务,比如一个工作线程使用先进后出的方式执行子任务,另一个空闲的工作线程通过先进先出的方式”偷”任务。
结合 ForkJoinPool 大概可以理解成
- 用户往 ForkJoinPool 中添加的 Runnable 或 Callable 务并不一定会创建一个对应的 ForkJoinWorkerThread (和Thread一一对应), 而是被作为一个 ForkJoinTask 子任务,等待空闲或者新建的ForkJoinWorkerThread来执行。
- ForkJoinPool 和 ForkJoinWorkerThread 各自维护一个 workQueue
- ForkJoinPool 中的 workQueue, 奇数位是存储的是 ForkJoinWorkerThread,偶数位存放的是 ForkJoinTask[] 数组
- ForkJoinWorkerThread 中的 workQueue 中主要存放的是当前工作线程需要执行的子任务,即ForkJoinTask[] 数组
- ForkJoinWorkerThread 在执行的过程中会调用 ForkJoinPool 提供的
runWork()方法,不断通过scan()扫描 workQueue ,如果有空闲线程或工作线程过少则会尝试 steal,将 ForkJoinTask 交给别的 Thread 执行
基于此,ForkJoinPool执行的流程图如下:
至于其他参数和具体的方法等,建议阅读下面这篇文章,讲得很详细
Virtual Thread#
OPENJDK19 首次出现了 Virtual Threads 的概念,即虚拟线程。根据描述,虚拟线程是一个轻量级的线程。在 Hotstop 虚拟机层面,它的实现还是基于 JavaThread,仅是添加了一个对象指针_vthread来代表 Virtual Threads。( JEP 425: Virtual Threads (Preview), JEP 436: Virtual Threads (Second Preview), JEP 444: Virtual Threads )
那么 Java 中已经这些线程池,为什么还需要 Virtual Threads ?
虽说基于线程共享的 ForkJoinPool 已经提高了任务执行的吞吐量,但是相比于 thread-per-request 模式还是有一些缺陷。thread-per-request 旨在一个请求关联一个线程,从而让代码更容易理解、调试和维护,线程共享会使之复杂化。 Virtual Threads 的目标就是于此,带来更清晰的代码执行和更容易理解的线程结构。
虚拟线程是作为守护线程运行的,且被普通线程 Thread 来调度。这里不展开讲了,具体大家可以看 OPENJDK 的官方 JEP。
Thinking About Massive Throughput? Meet Virtual Threads!
Golang Goroutine#
相较于每个 os 现成固定分配 2M 的内存,goroutine 的栈采用了动态扩容,初始时进位2KB,随着任务执行按需增长,32位机器最大可达到256M,64位机器最大可达到1G;此外 GO 还会周期性回收不再使用的内存收缩栈空间。
下面我们具体展开讲讲 GPM 这套执行 Goroutine 的调度模型。
✨ 整理这部分内容的时候,发现有很多优秀的文章介绍得很清楚,在本文中不会特别详细地展开源码,这里推荐两篇文章
深入分析Go1.18 GMP调度器底层原理-腾讯云开发者社区-腾讯云
GPM#
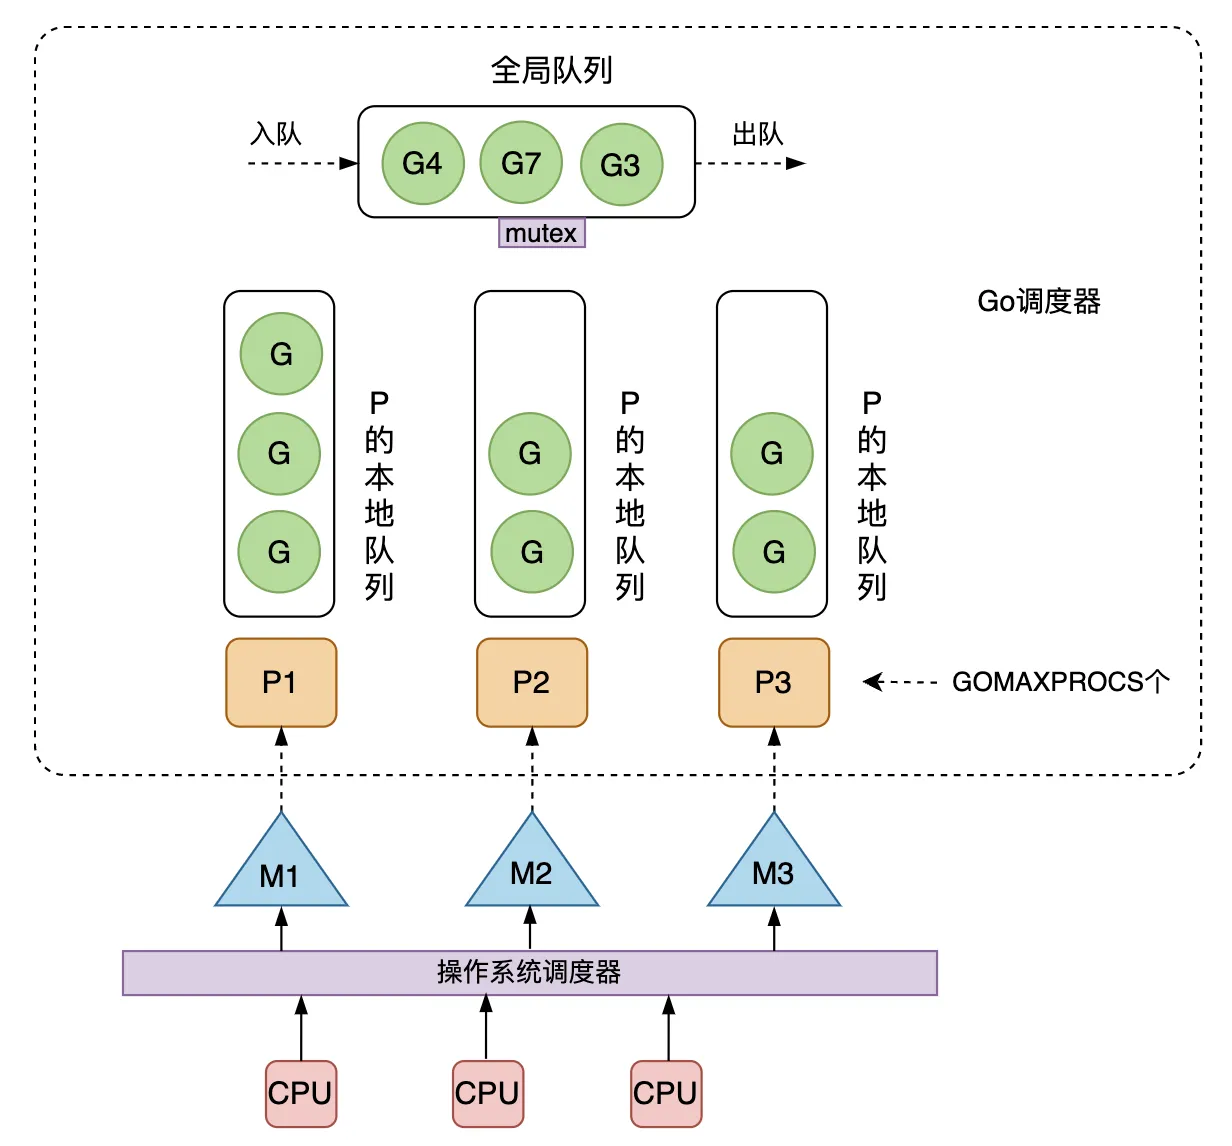
GPM 运行时调度器中有三个重要的组成部分
- G:goroutine,代表一个待执行的任务,可以类比 runnable
- M:表示操作系统线程即 OS Thread,由操作系统的调度器进行调度和管理
- P:处理器,表示运行在线程上的本地调度器
具体的数据结构定义,在源码中 go/src/runtime/runtime2.go 路径下,下面仅列出部分参数:
var(
	allm       *m            // m
	gomaxprocs int32         // p 最大数量
	ncpu       int32         // cpu 数
    forcegc    forcegcstate  // 强制 GC
    sched      schedt        // 全局调度器
	allp []*p                // p
	allpLock mutex           // 读写 allp 时用的锁
	idlepMask pMask          // 空闲 p,每个 p 对应 pMask 中的
	timerpMask pMask         //
)

type g struct {
    stack       stack   // goroutine 栈内存
	_panic    *_panic // goroutine 内部 panic
	_defer    *_defer // goroutine 内部 defer
	m         *m      // 当前 g 使用的 m
	sched     gobuf   // goroutine 调度数据
	param        unsafe.Pointer  // param 是用于传递的通用指针参数字段
	atomicstatus atomic.Uint32 // goroutine 状态
	goid         uint64        // goroutine ID
	waitsince    int64      // goroutine 阻塞时间
	preempt       bool // 抢占信号
	......
}

type m struct {
	g0      *g     // goroutine
	morebuf gobuf  // gobuf arg to morestack
	tls           [tlsSlots]uintptr // thread-local 线程本地存储
	curg          *g // 正在执行的 g
	p             puintptr // 用于执行 go 代码的 p
	nextp         puintptr
	oldp          puintptr // 在执行 syscall 之前的 p
	mstartfn      func()   // m 启动函数
	id            int64

	// 信号抢占
	gsignal       *g                // signal-handling g
	goSigStack    gsignalStack      // Go-allocated signal handling stack
	sigmask       sigset            // storage for saved signal mask
	signalPending atomic.Uint32 // Whether this is a pending preemption signal on this M.
	preemptGen atomic.Uint32	// counts the number of completed preemption signals
    ......
}

type p struct {
	id          int32
	status      uint32
	m           muintptr   // back-link to associated m (nil if idle)
	mcache      *mcache    // p 所在 m 的 缓存
	pcache      pageCache
	goidcache    uint64 // goroutine ids 缓存
	// goroutines 队列
	runqhead uint32
	runqtail uint32
	runq     [256]guintptr
	gcw gcWork  // GC 执行时的缓冲区
	wbBuf wbBuf // GC 写入缓冲区,未来可能会放在 g 中
	sysmontick  sysmontick // 记录上一次 sysmon 抢占的信号
	......
}

type schedt struct {
	goidgen   atomic.Uint64 // 全局 goroutine id 生成
	lock mutex // 全局调度器的锁
	midle        muintptr // 等待工作的空闲 m
	maxmcount    int32    // 允许的 m 的最大数量

	pidle        puintptr // 空闲 p

	// 全局的 runnable 队列
	runq     gQueue
	runqsize int32

	// dead G 全局缓存,避免每次创建 goroutine 时重新分配内存
	gFree struct {
		lock    mutex
		stack   gList // Gs with stacks
		noStack gList // Gs without stacks
		n       int32
	}

	// sudog 缓存,sudog 代表等待列表中的goroutine
	sudoglock  mutex
	sudogcache *sudog

	freem *m // 等待释放的 m 列表

	idleTime atomic.Int64 // p 的空闲时间

	// sysmon 用于协作抢占
	sysmonwait atomic.Bool
	sysmonnote note
	sysmonlock mutex
	......
}
结合下图可以知道,p 和 m 是一对一绑定的,m 即 绑定操作系统线程,可运行的 g 是通过调度到 p 的 本地队列 runq 来执行的,全局队列中维护了一个 schedt 来保证 g 调度到 p 的队列。
通俗地讲,schedt 类似一个全局的 pool 来负责 g (task) 绑定到 p (task thread) 中的队列,p (task thread) 会绑定一个 m (os thread) 用于真正的操作系统端的执行。
基于此 GPM 模型的核心思想是:
- 尽可能复用线程 M: 避免频繁的操作系统线程的创建、销毁和切换
- 多核并行能力:获取 CPU 的核心数,以此来限制 M 和 P 的数量,对应的全局变量是
gomaxprocs - 工作窃取 Work Stealing:M 优先执行 P 的本地队列,如果 P 中的队列空闲,则会从其他 M 绑定的 P 中窃取 G 来执行。源码在 go/src/runtime/proc.go,方法调用路径是
findRunnable() → stealWork() → runqsteal() - 交接 Hand Off: M 阻塞时,会把 M 上 P 的运行队列交给其他 M 执行,由
handoffp()方法执行 - 抢占调度
- 基于协作式的超时抢占:防止新的 G 一直获取不到 M 执行造成饥饿问题, 每个 G 运行 10ms 就要让出 M,让其他 G 去执行。源码在 go/src/runtime/proc.go, 方法调用路径是
sysmon() → retake() → preemptone() - 基于信号的抢占:部分任务如轮训计算、GC等情况,sysmon 无法扫描到,故无法抢占成功,所以有了机遇信号的抢占。原理是注册绑定 SIGURG 信号和处理方法 doSigPreempt。源码在 go/src/runtime/signal_unix.go,方法调用路径是
sigtrampgo() → sighandler() → doSigPreempt(),doSigPreempt会改变 和 g 关联 m 的preemptGen和signalPending
- 基于协作式的超时抢占:防止新的 G 一直获取不到 M 执行造成饥饿问题, 每个 G 运行 10ms 就要让出 M,让其他 G 去执行。源码在 go/src/runtime/proc.go, 方法调用路径是
下面展开说说这些的源码实现
exit/panic 的调度#
正常情况下,如果 goroutine syscall 退出或者执行时发生panic,则会统一走 Gosched()方法进行调度,源码在 go/src/runtime/proc.go,方法的调用路径是Gosched() → gosched_m()→ goschedImpl(),goschedImpl 函数中会删除 g 和 m 的关联关系,并将 g 重新放回全局调度器的队列 runq 中。
// src/runtime/proc.go

// 退出 syscall 后的调度
func exitsyscall() {
	...
	if sched.disable.user && !schedEnabled(gp) {
			// 发起调度
			Gosched()
	}
	...
}

// main goroutine 中监控触发 panic 的 defer 的 goroutine
func main() {
	...
	if runningPanicDefers.Load() != 0 {
		// Running deferred functions should not take long.
		for c := 0; c < 1000; c++ {
			if runningPanicDefers.Load() == 0 {
				break
			}
			// 发起调度
			Gosched()
		}
	}
	...
}

// 开始调度
func Gosched() {
	checkTimeouts()
	mcall(gosched_m)
}

func gosched_m(gp *g) {
	if trace.enabled {
		traceGoSched()
	}
	goschedImpl(gp)
}

func goschedImpl(gp *g) {
	status := readgstatus(gp)
	if status&^_Gscan != _Grunning {
		dumpgstatus(gp)
		throw("bad g status")
	}
	casgstatus(gp, _Grunning, _Grunnable)
	// 删除 g 和 m 的关联关系
	dropg()
	lock(&sched.lock)
	// 将 g 放回全局队列 runq
	globrunqput(gp)
	unlock(&sched.lock)

	schedule()
}
协作式的抢占调度——超时抢占#
goalng 中专门用了一个 main goroutine 来监控整个 GPM 中的 goroutine 运行的情况,超时抢占调度是监控中的一个重要功能。超时抢占调度主要是监控运行超过 10ms 的 goroutine,针对这种 goroutine 直接进行抢占式调度,方法的调用链是 main() → sysom() → retake() → preemptone(),具体源码在
go/src/runtime/proc.go。
// src/runtime/proc.go

// The main goroutine.
func main() {
	...
	if GOARCH != "wasm" { // no threads on wasm yet, so no sysmon
		systemstack(func() {
			newm(sysmon, nil, -1)
		})
	}
	...
}

func sysmon() {
	...
	// retake P's blocked in syscalls
	// and preempt long running G's
	if retake(now) != 0 {
		idle = 0
	} else {
		idle++
	}
	...
}

const forcePreemptNS = 10 * 1000 * 1000 // 10ms

func retake(now int64) uint32 {
	...
	for i := 0; i < len(allp); i++ {
		pp := allp[i]
		if pp == nil {
			continue
		}
		pd := &pp.sysmontick
		s := pp.status
		sysretake := false
		if s == _Prunning || s == _Psyscall {
			// Preempt G if it's running for too long.
			t := int64(pp.schedtick)
			if int64(pd.schedtick) != t {
				pd.schedtick = uint32(t)
				pd.schedwhen = now
			} else if pd.schedwhen+forcePreemptNS <= now { // 如果超过 10ms,抢占 preempt
				// 抢占调度
				preemptone(pp)
				// In case of syscall, preemptone() doesn't
				// work, because there is no M wired to P.
				sysretake = true
			}
		}
	}
	...
}
非协作式抢占调度——信号抢占#
基于协作的超时抢占调度是有缺陷的 ( runtime: non-cooperative goroutine preemption #24543),在 for 循环、垃圾回收等一些场景,如果长时间占用线程是没法监测到的。为此在 Go1.14 版本新增了信号抢占调度。
为了实现信号抢占,在 M 中添加了preemptGen 和signalPending 用于判断信号抢占的的情况,并在全局定义了pendingPreemptSignals。具体的源代码在 go/src/runtime/signal_unix.go 和
go/src/runtime/preempt.go,方法调用链分为两部分:
- 一部分是
sighandler() → doSigPreempt(),用于触发抢占信号的修改 - 另一部分是
suspendG() → preemptM(),用于监控抢占信号,并发生真正的抢占动作
// src/runtime/signal_unix.go

// 触发信号事件,进行抢占信号的修改
func sighandler(sig uint32, info *siginfo, ctxt unsafe.Pointer, gp *g) {
	...
	if sig == sigPreempt && debug.asyncpreemptoff == 0 && !delayedSignal {
		// Might be a preemption signal.
		doSigPreempt(gp, c)
	}
	...
}

func doSigPreempt(gp *g, ctxt *sigctxt) {
	// Check if this G wants to be preempted and is safe to
	// preempt.
	if wantAsyncPreempt(gp) {
		if ok, newpc := isAsyncSafePoint(gp, ctxt.sigpc(), ctxt.sigsp(), ctxt.siglr()); ok {
			// Adjust the PC and inject a call to asyncPreempt.
			ctxt.pushCall(abi.FuncPCABI0(asyncPreempt), newpc)
		}
	}

	// 修改 g 关联 m 的 抢占信号
	// Acknowledge the preemption.
	gp.m.preemptGen.Add(1)
	gp.m.signalPending.Store(0)

	if GOOS == "darwin" || GOOS == "ios" {
		pendingPreemptSignals.Add(-1)
	}
}

// src/runtime/preempt.go

// 监控抢占信号状态,并执行抢占动作
func suspendG(gp *g) suspendGState {
    ......
	for i := 0; ; i++ {
		switch s := readgstatus(gp); s {
			case _Grunning:
					// Prepare for asynchronous preemption.
				asyncM2 := gp.m
				// 获取 m 中的 preemptGen
				asyncGen2 := asyncM2.preemptGen.Load()
				needAsync := asyncM != asyncM2 || asyncGen != asyncGen2
				asyncM = asyncM2
				asyncGen = asyncGen2
				// cas 确认 g 状态
				casfrom_Gscanstatus(gp, _Gscanrunning, _Grunning)
				if preemptMSupported && debug.asyncpreemptoff == 0 && needAsync {
					now := nanotime()
					if now >= nextPreemptM {
						nextPreemptM = now + yieldDelay/2
						// 抢占 M
						preemptM(asyncM)
					}
				}
		}
		...
	}
	...
}

func preemptM(mp *m) {
	if GOOS == "darwin" || GOOS == "ios" {
		execLock.rlock()
	}

	if mp.signalPending.CompareAndSwap(0, 1) {
		if GOOS == "darwin" || GOOS == "ios" {
			pendingPreemptSignals.Add(1)
		}

		signalM(mp, sigPreempt)
	}

	if GOOS == "darwin" || GOOS == "ios" {
		execLock.runlock()
	}
}
工作窃取 work stealing#
工作窃取是 Fork-Join 模型的一个核心,我们看到 Java 中的 ForkJoinThread 也有这个,同样的,go 中的 work stealing 实现也类似于 java 中的 ForkJoinPool,即在全局调度中 findRunnable ,找寻待执行的任务,并尝试 steal 到空闲的 p 中,下面我们看一下源码,具体在
go/src/runtime/proc.go。
func schedule() {
	...
	gp, inheritTime, tryWakeP := findRunnable() // blocks until work is available
	...
}

func findRunnable() (gp *g, inheritTime, tryWakeP bool) {
	...
	// Spinning Ms: steal work from other Ps.
	if mp.spinning || 2*sched.nmspinning.Load() < gomaxprocs-sched.npidle.Load() {
		if !mp.spinning {
			mp.becomeSpinning()
		}
		// 尝试偷 待执行的 goroutine 或者 timer 从任一 p 中
		gp, inheritTime, tnow, w, newWork := stealWork(now)
		if gp != nil {
			// Successfully stole.
			return gp, inheritTime, false
		}
		...
	}
}
Go: Work-Stealing in Go Scheduler
交接 hand off#
交接主要是接管 syscall 或者 locked 被阻塞的 m,将其对应的 g 交给别的 p 来执行,具体在
go/src/runtime/proc.go 的handoffp() 方法中,调用到 handoffp() 的路径有下面几条:
- m 退出调用:
mexit() → handoffp() - 全局监控器调用:
sysmon() → retake() → handoffp() - 进入 syscall 阻塞时调用:
entersyscallblock() → entersyscallblock_handoff() → handoffp() - 退出 syscall 时调用:
exitsyscall() → exitsyscall0() → stoplockedm() → handoffp() - 每个 p 在进行 gc 时调用:
forEachP() → handoffp()
Go 关键字的编译#
在 go 中只需要通过声明 go 关键字就可以创建一个goroutine,具体实现是通过在编译的时候,编译器会将 go 关键字转换成 newproc() 函数调用,编译的转换具体是在 go/src/cmd/compile/internal/ssagen/ssa.go。
// src/cmd/compile/internal/ssagen/ssa.go

func (s *state) stmt(n ir.Node) {
	...
	s.stmtList(n.Init())
	switch n.Op() {
	case ir.OGO:
		n := n.(*ir.GoDeferStmt)
		s.callResult(n.Call.(*ir.CallExpr), callGo)
	}
}

func (s *state) call(n *ir.CallExpr, k callKind, returnResultAddr bool) *ssa.Value {
	...
	switch {
		case k == callGo:
			aux := ssa.StaticAuxCall(ir.Syms.Newproc, s.f.ABIDefault.ABIAnalyzeTypes(nil, ACArgs, ACResults))
			call = s.newValue0A(ssa.OpStaticLECall, aux.LateExpansionResultType(), aux)
	}
}
newproc()方法中会创建一个*_Grunnable* 状态的 goroutine
// Create a new g running fn.
// Put it on the queue of g's waiting to run.
// The compiler turns a go statement into a call to this.
func newproc(fn *funcval) {
	gp := getg()
	pc := getcallerpc()
	systemstack(func() {
		newg := newproc1(fn, gp, pc)

		pp := getg().m.p.ptr()
		runqput(pp, newg, true)

		if mainStarted {
			wakep()
		}
	})
}
总结#
Java 的设计思路是,先基于底层的线程模型进行一一对应的实现,然后再次基础上封装并发工具,如 Executors 中提供的各种各样的线程池,大体上是基于 池化 和 ForkJoin 的思想构建了2中线程池。坏处是需要开发人员去理解之后才会更优雅地使用,增加了编程难度。
反观 Go 提供的 GPM,虽说也是基于 Fork-Join 的模式构建的,但在此基础上加了监控和抢占调度,并将这套相对复杂的设计封装在 Go SDK 中。用户层面来说,只需要通过 go 关键字就可以快速实现,并在 GPM 提供的多线程保证情况下,开发人员不需要专门去了解其设计思路也能很好的实现高并发和高吞吐量,编程难度降低且写法也大大简化。
其他#
内存模型这部分暂不整理了,有机会之后再整理,相关的文档可以参考这些